If you have ever styled a tree and wished for a branch in a specific spot, thread grafting bonsai gives you that control. You use this bonsai grafting technique to place a new branch exactly where the design needs it, instead of settling for what the tree offers.
Thread grafting involves drilling a clean hole through the trunk or branch and passing a living shoot through it so it fuses and becomes a permanent branch in the exact position you choose. Because the shoot stays attached to its original roots during the process, success rates are often higher than with some other grafting techniques.
You can apply thread grafting on many deciduous and broadleaf evergreen species. Timing depends on your goal: late winter before buds swell suits some approaches, while the summer growth window from late May through July is often the most reliable period for UK growers working with deciduous material in active growth.
With the right tools, careful alignment of the cambium, and patient aftercare, you can reshape structure with precision, whether you are refining advanced material or exploring bonsai for beginners.
Tree missing a branch in a specific position on older wood that will not back bud: thread grafting is the most reliable solution. Identify a long, flexible shoot on the same tree, drill a clean hole at the correct angle, and thread the shoot through during the late May to July window. Expect six to twelve months before fusion is confirmed and the original connection can be removed.
Tree with uneven or underdeveloped nebari needing surface root improvement: thread grafting at the base works on the same principle as trunk threading. Select young, flexible shoots and guide them across the surface roots or through shallow drilled channels in exposed roots. The technique is covered in full in the nebari section below.
Tree that has already been threaded and you are monitoring for fusion: the primary indicator is swelling and strong growth at the exit point. Do not cut the original shoot connection until that swelling is clear and independent growth is confirmed. Cutting too early is the most common reason thread grafts fail at the final stage.
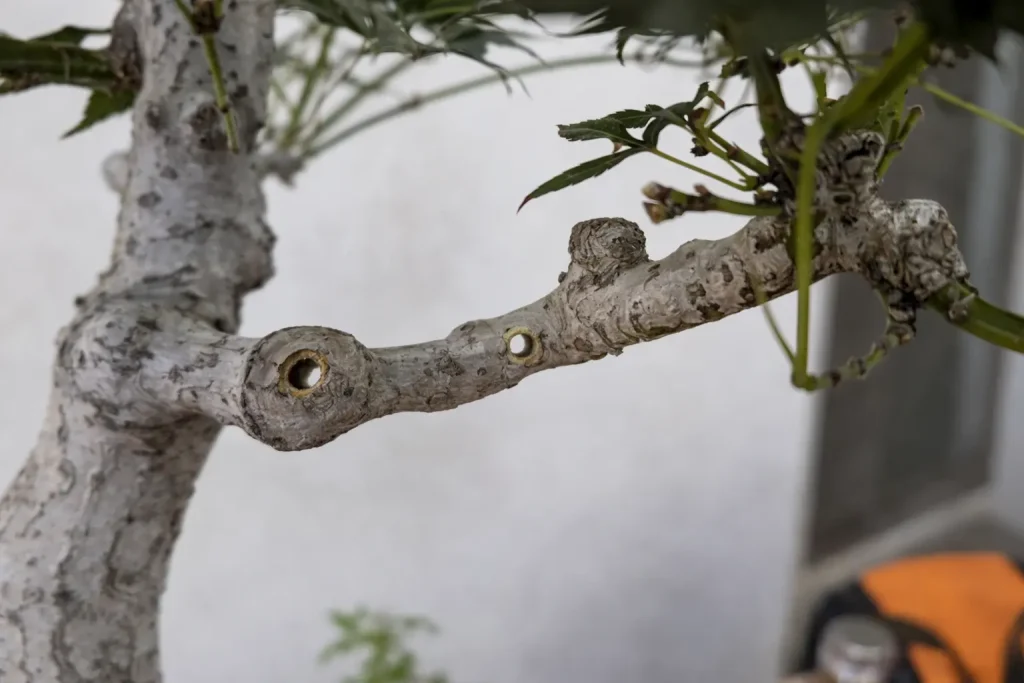
Thread grafting allows you to place a branch exactly where your bonsai design needs it. You guide a living shoot through the trunk or surface roots so it fuses in position, helping you correct structure and improve nebari with precision.
Thread grafting is one of the most reliable bonsai grafting techniques because the shoot stays attached to its original roots during healing.
You drill a clean hole through the trunk or surface root where you want the new branch. The hole must be slightly wider than the young, flexible shoot so you do not scrape away the cambium layer.
You then:
As the season progresses, both the trunk and the threaded shoot thicken. The cambium layers press together and gradually fuse.
A clear sign of success appears when the exit side thickens and grows strongly. At that point, you can remove the original section of the shoot, leaving a natural looking branch emerging from the trunk.
This simple biological fusion makes thread grafting bonsai highly dependable in bonsai cultivation.
You use thread grafting when a tree refuses to produce a branch where you need one.
This often happens in species that do not back bud easily on older wood, such as:
Instead of waiting years for a bud that may never appear, you create the branch yourself.
Thread grafting also works well when:
Compared to approach grafting or scion grafting, thread grafting offers higher success rates because the shoot remains fed by its original root system during the healing phase. In practical terms, you reduce risk while gaining precise control over structure.
For UK growers, late May through July is the most reliable window for thread grafting deciduous species. At this point in the season, trees are in active growth, sap flow is strong, and the cambium is responding quickly.
The shoot you thread through the trunk is drawing energy from its own roots while simultaneously pushing new growth, which accelerates fusion compared to grafts carried out on slower-moving spring wood.
This window suits both planned structural work and trees that have established well into the growing season and are showing strong vigour.
Avoid attempting thread grafts once growth begins to slow in late summer, as the reduced cambium activity extends healing time significantly into the following year.
Strong bonsai design depends on branch placement, taper, and surface root spread. Thread grafting helps you refine all three.
For branch structure, you can:
Because the new branch fuses naturally into the trunk, it looks as if it always grew there. This improves aesthetic appeal without visible scars.
You also use thread grafting at the base of the tree to improve nebari. By threading young shoots or roots across the surface, you encourage fusion that creates a wider, more balanced root flare.
Within the broader scope of bonsai techniques, thread grafting gives you controlled, predictable results. It turns structural problems into design opportunities while keeping the tree healthy and stable.
When you apply thread grafting at the base of the tree, the principle is the same as trunk threading, but the scale and angle differ.
Select young, flexible shoots from the lower trunk or from adjacent roots. These shoots should be long enough to reach the area where you want to improve surface root spread.
You have two practical approaches:
Surface threading: guide the shoot across the nebari surface and anchor it at both ends using soft ties or small stakes. As the shoot thickens in contact with existing roots, the cambium layers press together and fuse. Over time, the shoot becomes part of the visible root structure.
Drilled channel threading: drill a shallow, angled hole through an existing surface root where you want to add width or create a connection between two separate roots. Thread the young shoot through the channel as you would for a trunk graft. The shoot fuses inside the channel and emerges to widen the visible root structure.
Work during the same late May to July window used for trunk threading. Roots respond to the same cambium activity that drives shoot fusion.
Aftercare follows the same principles: shelter from strong wind, consistent moisture, and no heavy feeding until strong independent growth confirms fusion. Nebari improvements through thread grafting typically take one to two full growing seasons before the result looks natural and established.
Thread grafting relies on careful preparation, clean tools, and tight cambium contact between scion and rootstock. When you control timing, pressure, and aftercare, you give the graft union the best chance to form strong callus and grow as one branch.
You start with a healthy scion and rootstock. In most bonsai work, you use a vigorous shoot from the same tree to ensure a compatible rootstock and strong graft success.
Choose a flexible, pencil thin shoot from the current or previous season’s growth. It should carry healthy buds and show no signs of pests or dieback. Avoid weak or shaded growth, as growth rates matter during fusion.
For the rootstock, select a spot with active sap flow. For UK growers, the summer window from late May through July is the most reliable timing for deciduous species, when sap flow is strong and the cambium is responding quickly.
Late winter to early spring is an alternative, but expect slower fusion as the cambium is less active at that stage.
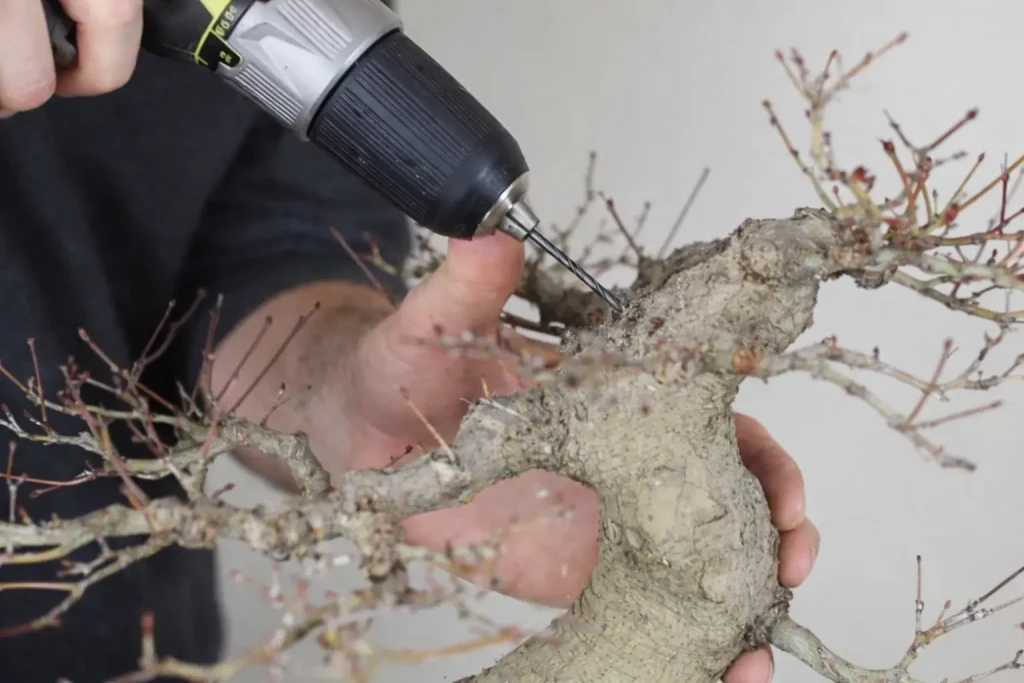
Drill a hole slightly wider than the scion. The hole must pass cleanly through the trunk or branch at the exact angle you want the new branch to sit. Clean cuts and smooth edges support faster callus formation.
Keep both surfaces moist and work quickly so the cambium layer does not dry out.
Using proper bonsai grafting tools improves accuracy and reduces damage. You keep everything sterile before cutting.
Essential grafting tools:
A sharp grafting knife allows you to shave small sections of bark if you need to expose fresh cambium. Grafting tape or buddy tape holds the scion steady without cutting into it as it thickens.
Apply cut paste around entry and exit holes. This limits moisture loss and supports wound sealing.
In a bonsai workshop setting, you also keep alcohol wipes on hand to sterilise blades between trees.
The key to successful grafting bonsai is tight cambium contact. The cambium layer sits just beneath the bark and produces new vascular tissue.
After threading the scion through the drilled hole, ensure the bark of the scion presses firmly against the inner edge of the rootstock hole. Even partial cambium contact can work, but tight cambium contact increases graft success.
Pull the scion through until buds sit just beyond the exit point. Then secure it gently with grafting tape so it cannot shift in wind.
Movement breaks early callus formation. Stability allows cells from both scion and rootstock to merge and form a solid graft union.
Over several months, the scion thickens. As it swells, it locks itself into the trunk and strengthens the union naturally.
Good post-grafting care determines whether the union holds. You treat the tree as actively recovering, not as a finished project.
Place the bonsai in bright but sheltered conditions. Avoid strong wind and extreme heat for several weeks.
Maintain consistent watering. Do not overfeed immediately. Once strong growth resumes, light feeding supports callus formation and steady growth rates.
Inspect the graft every few weeks:
Most thread grafts take 6 to 12 months to fully establish. Only after the graft union feels solid and the scion shows independent growth do you consider cutting the original connection if approach techniques were involved.
Patience and steady graft care give you the strongest long term results.
In our experience, the most common thread grafting mistake is cutting the original shoot connection too early. The exit side looks healthy, growth seems strong, and the temptation is to complete the graft and move on. But unless the exit point has visibly swollen and the shoot is clearly growing independently of its original attachment, cutting too soon starves the new branch of its only reliable food source. Wait longer than feels necessary. A thread graft that takes fourteen months to confirm is still a success. One cut too early means starting again from scratch.
Miyagi Bonsai stocks a carefully chosen range of bonsai trees and grafting supplies suited to UK growing conditions, including cut paste, grafting tape, and sharp grafting tools, with next working day UK delivery available on most orders. The products and recommendations in this guide reflect what we stock, use, and see working for our customers every day. We are rated 5 stars across over 100 Google reviews, and our team is on hand by email and phone if you have any questions about thread grafting technique, timing, or species suitability.
Most thread grafts on deciduous species take six to twelve months to fuse fully when carried out during the late May to July window in the UK. You confirm fusion when the exit point has visibly swollen and the shoot grows strongly and independently. Grafts carried out during slower-moving late winter wood can take longer, sometimes into a second growing season. Do not cut the original shoot connection based on time alone. Use the swelling at the exit point as your indicator, not the calendar.
Species with vigorous cambium activity and reliable sap flow during the growing season respond best. Japanese maple, trident maple, Chinese elm, and hornbeam are among the most reliable for UK growers. Ficus responds well year-round under warm indoor conditions. Pine and other conifers can be thread grafted but require more precise timing, typically aligned with active growth phases rather than the general summer window. Fruit trees, including apple and quince, also respond well. Species that back bud poorly on old wood are often good candidates precisely because their cambium remains active when stimulated by a threaded shoot under pressure.
Autumn thread grafting is not recommended for most temperate deciduous species in the UK. As growth slows and the tree moves towards dormancy, cambium activity drops sharply. A graft started in September or October may sit largely inactive through winter with minimal fusion, leaving the wound exposed for months before conditions improve in spring. The risk of failure and disease entry increases significantly compared to the summer window. Late winter to early spring, just before buds swell, is a viable alternative to summer for growers who want to work ahead of active growth, though fusion is slower than during the peak summer window. For indoor tropical species such as ficus, autumn and winter grafting is more feasible provided temperatures remain stable and growth continues.